Iron Butterfly Options Strategy: Beginner's Guide
An iron butterfly is a four-leg net credit options trade with defined risk that aims to profit when the stock stays near the middle, short strike price.
The iron butterfly (sometimes called the iron fly) involves selling a call and a put at the same strike price and buying a further out of the money call and put to limit risk. This creates a position with defined risk and reward, ideal for neutral markets. The trade profits as the short options lose value over time, especially in a stable environment.
To conceptualize the trade, you can think of it in a few different ways:
- A short iron condor where the options sold are at the money
- An at the money bear call spread paired with a bull put spread
- A short straddle with out of the money wings bought to hedge risk
There are technically both long and short iron butterflies, but since nearly all are short, we simply call the short version an iron butterfly.
Highlights
💡 Iron Butterfly Strategy: Pro Takeaway
The iron butterfly is a great trade for advanced options traders looking to take advantage of time decay while controlling risk. It requires far less capital than a short straddle and limits losses to the width of the wings minus the credit received.
With the short call and short put sold at the money, the trade centers its max profit zone at the stock's current price, while the long wings cap tail risk. This creates a high-theta, high-probability structure that thrives when implied volatility contracts and the underlying stays rangebound.
It's especially popular with risk-minded 0DTE options traders who aim to capture fast time decay and collapsing implied volatility, which often hits by midday on expiration day.
But the trade isn't without risk. Gamma can spike as expiration approaches, and when the stock hovers near the short strike, small moves can cause big swings in delta. This can flip the position quickly, making active management essential.
In this article, we'll cover everything you need to know about the iron butterfly—when to use it, how to set it up, how to manage it, and some go-to tips for making it work.
🤔 New to advanced spreads? It helps immensely to understand how the short straddle works before learning the iron butterfly!
Iron Butterfly Components
The iron butterfly is comprised of four options:
- 🔴 Sell one at the money call
- 🔴 Sell one at the money put
- 🟢 Buy one out of the money call
- 🟢 Buy one out of the money put
- ⏳ All options share the same expiration
The long call and long put options are usually placed an equal distance from the short strike to keep the risk and reward balanced. It’s best to enter the trade as one complete spread. Legging in adds directional risk, especially near the short strike.
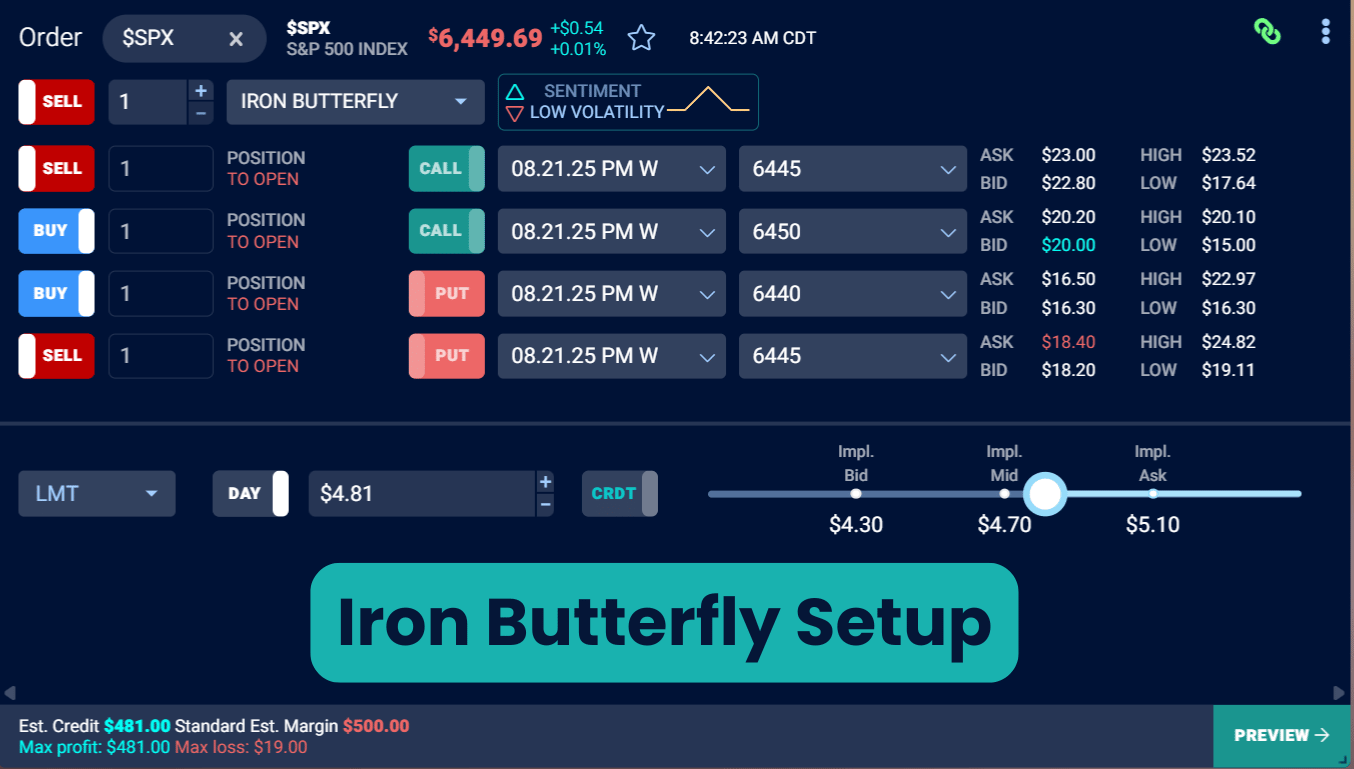
Below is an example of an iron butterfly easy trade setup on the TradingBlock dashboard.
Iron Butterflies: Bullish & Bearish Tints
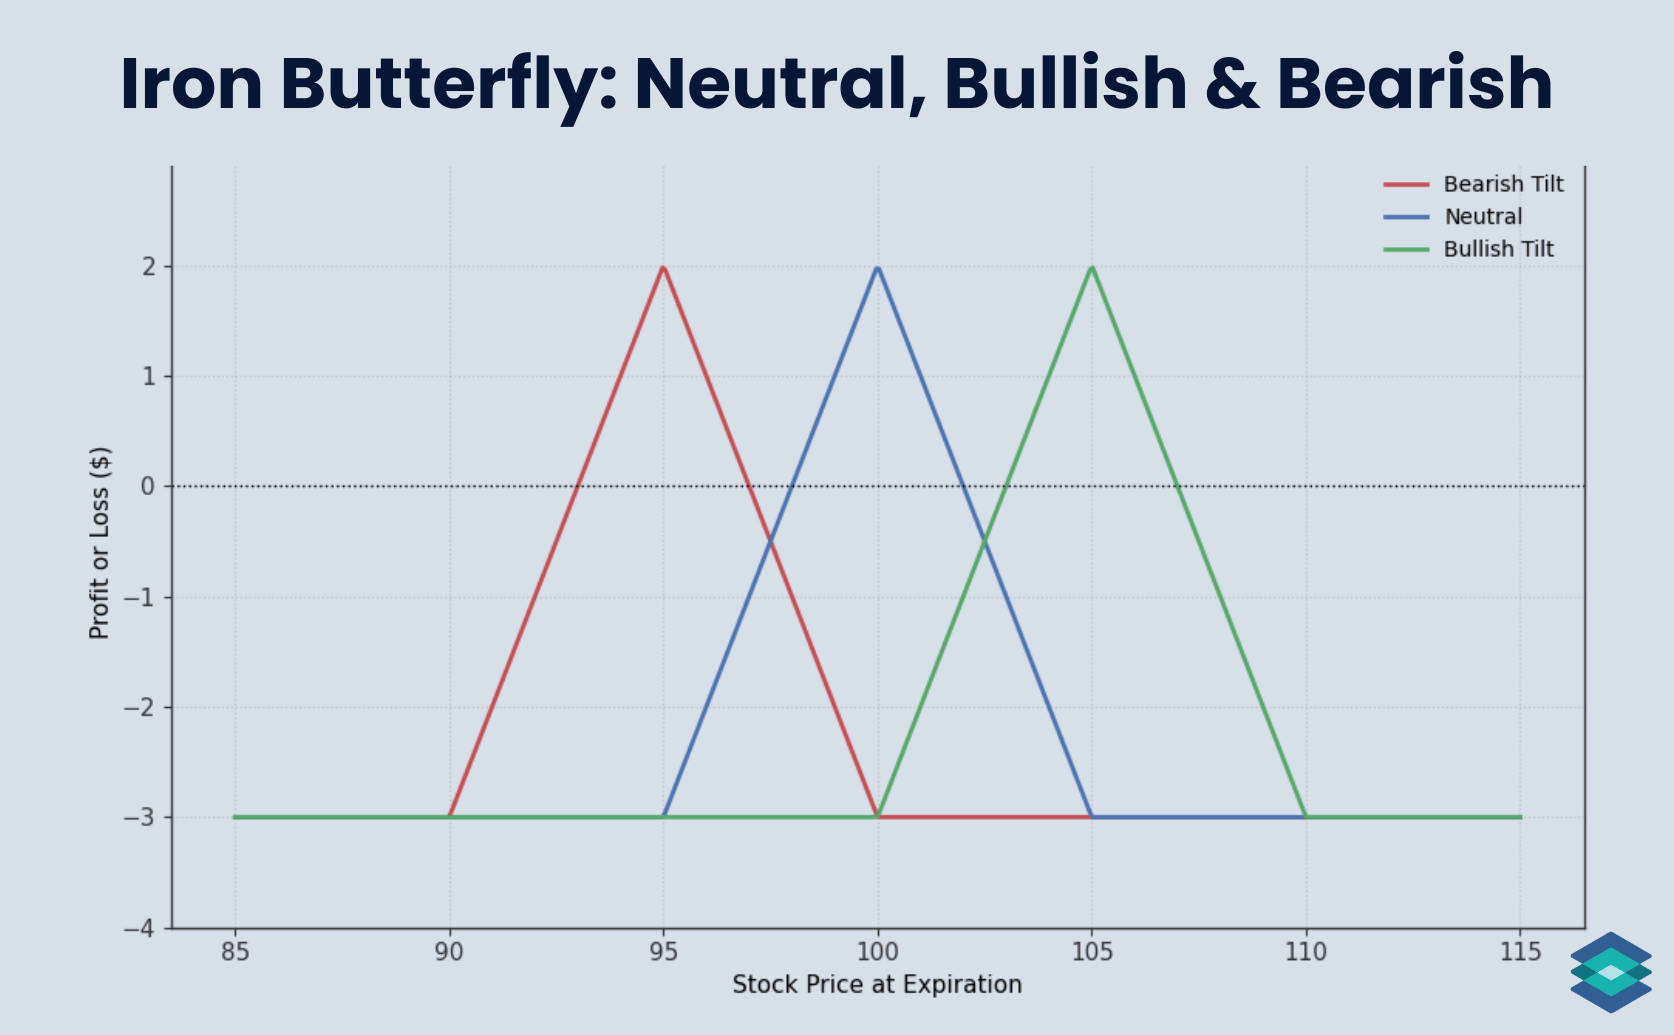
Iron butterflies don’t always have to be market neutral. If you’re leaning bullish, you can shift the short strike slightly higher. If you’re bearish, slide it lower.
For example, if a stock is trading at 100:
- A bearish iron butterfly could center the short strike at 95
- A neutral version would center it at 100
- A bullish version might center it at 105
We can see this below:
Iron Butterfly Payoff Profile
Let’s now break down the maximum profit, breakeven points, and maximum loss for the iron butterfly trade.
Maximum Profit Zone
The max profit on an iron butterfly is:
- Max Profit = Total Credit Received
This happens when the underlying asset pins the short strike at option expiration.
For example, let’s say ABC is trading at $100/share and we:
- Sell the 100 call for $2.50
- Sell the 100 put for $2.50
- Buy the 105 call for $1.00
- Buy the 95 put for $1.00
- Total credit received: $3.00 ($300)
If ABC finishes at $100 on expiration, all options expire worthless and you keep the full $300 credit. We can see this below:

Chances are, the stock will not pin the strike price on expiration. Even if it does, there is still pin risk as the stock settles after the closing bell.
If your underyling asset is trading near the short strike as expiration approaches, you’ll want to either exit the trade early or roll the position to avoid unwanted assignment.
Maximum Loss Zone
The max loss on an iron butterfly occurs when the stock finishes outside the wings at expiration.
- Max Loss = Wing Width – Total Credit Received
Let’s return to our iron butterfly example where ABC was trading at $100:
- Short strike: 100
- Long strikes: 95 and 105
- Total credit received: $3.00
If the stock finishes at $90, here’s what happens:
- The 95 put is worth $5
- The 100 put is worth $10
- All calls expire worthless
- Net loss = 10 – 5 – 3 = $2.00, or $200
We can see how the stock closing outside the wings results in a max loss below:

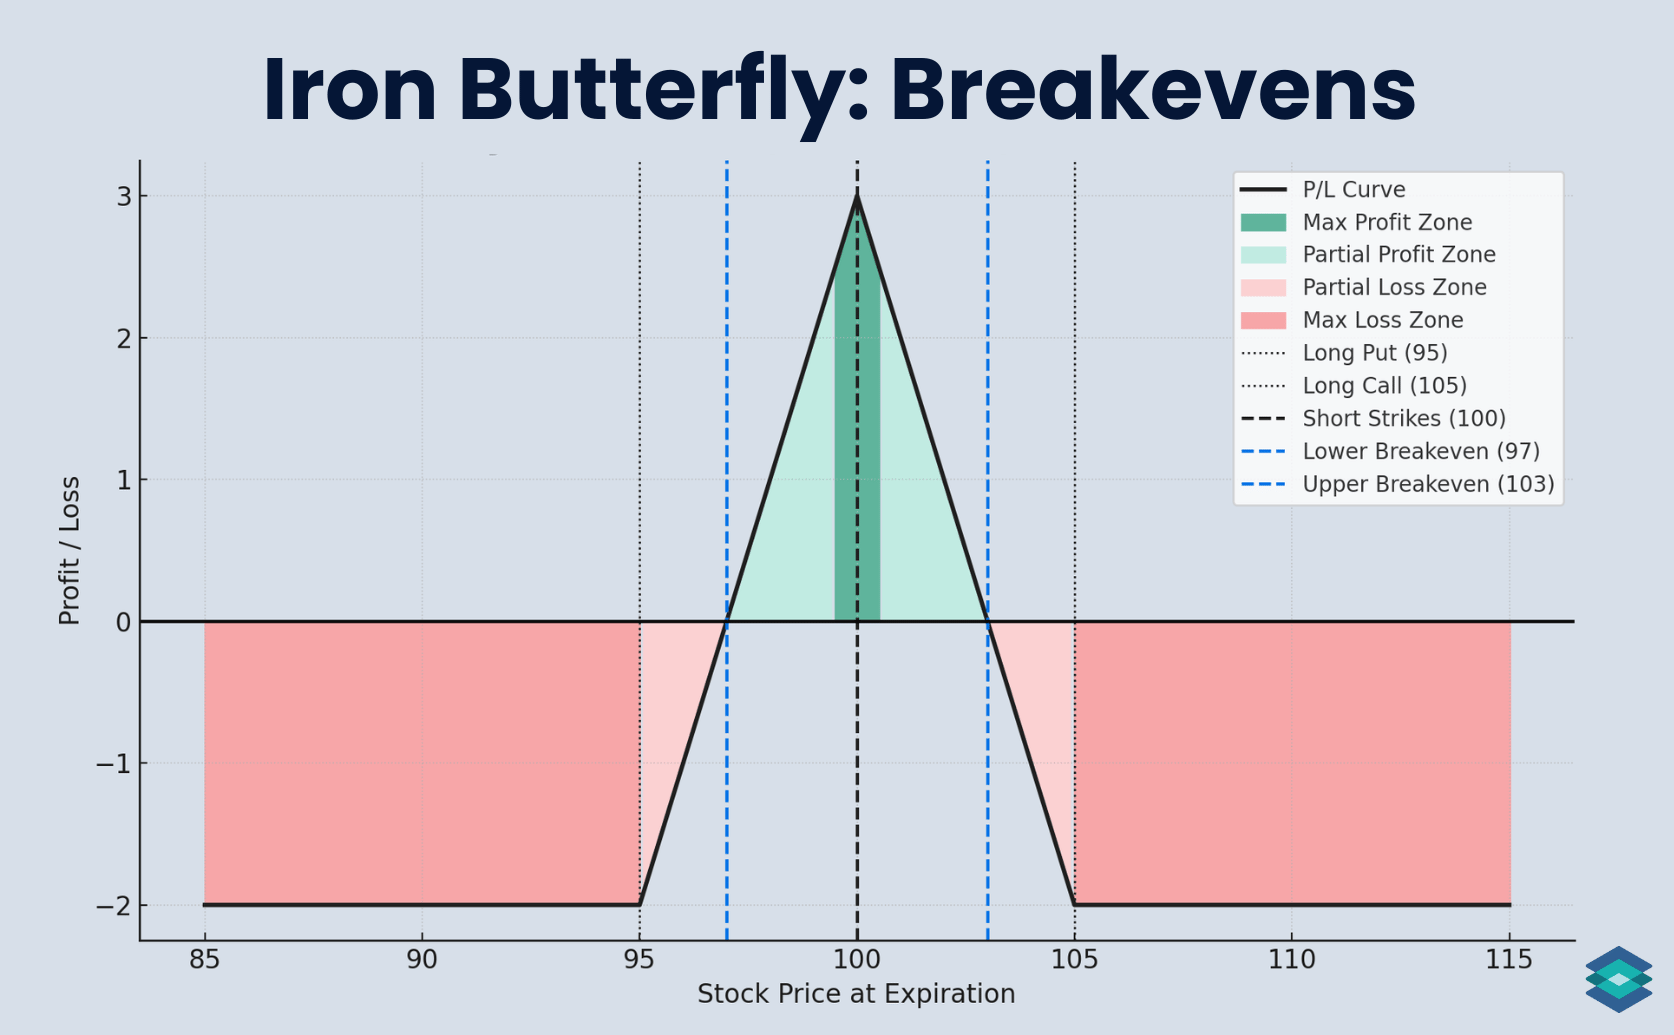
Breakeven Zone
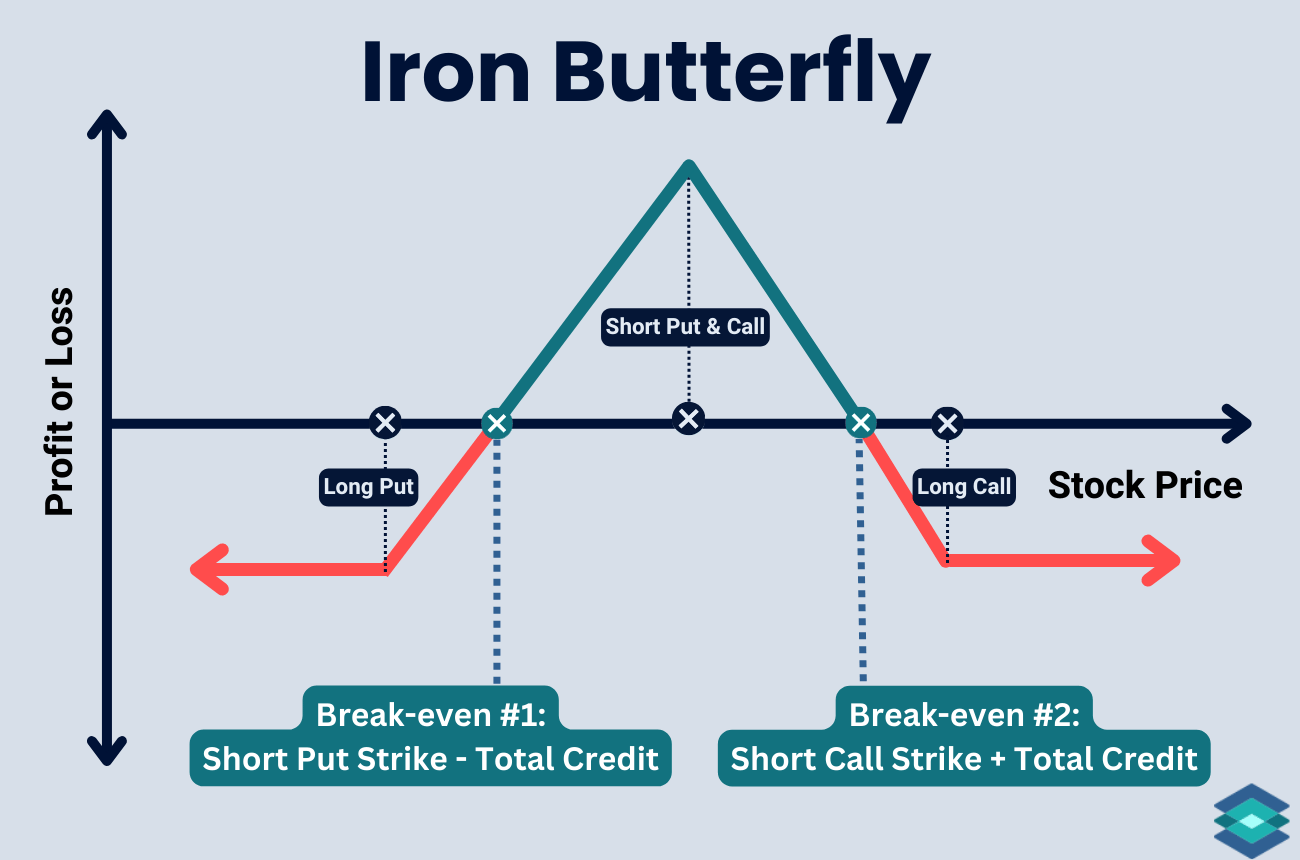
An iron butterfly has two breakeven points: one below the short strike and one above. Here's how to calculate them:
- Upper Breakeven = Short Strike + Total Credit Received
- Lower Breakeven = Short Strike – Total Credit Received
Going back to our previous example:
We sold the 100 strike call and 100 strike put, and bought the 95 put and 105 call, collecting a total credit of $3.00.
That gives us:
- Upper breakeven = 100 + 3 = 103
- Lower breakeven = 100 – 3 = 97
If the stock closes between 97 and 103, the trade finishes with a profit. But once it moves outside this range, losses start to build. We can see the ABC breakevens below:
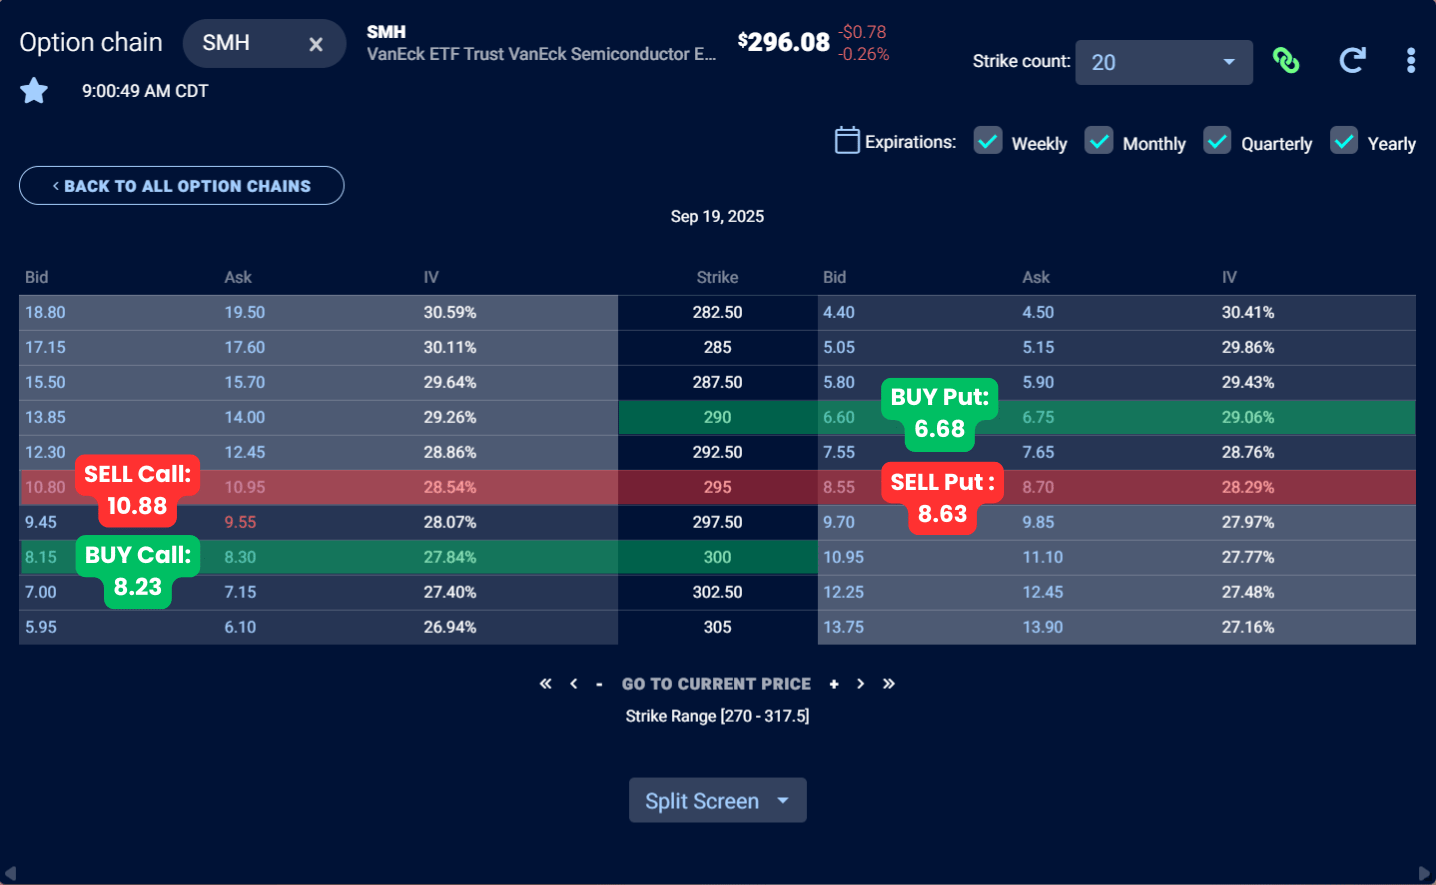
Iron Butterfly: SMH Trade Example
In this example, we’re setting up a short iron butterfly on SMH (VanEck Semiconductor ETF). But unlike textbook butterflies, this one isn’t perfectly centered. SMH is currently trading just above 296, and there’s no strike that exactly matches that level. So we’re selling the 295 puts and 295 calls, giving this setup a slightly bearish tilt.
We then buy protection on both sides: the 290 put below and the 300 call above. This defines the risk while keeping the max profit centered at 295.
As we will see, implied volatility (IV) is currently elevated on SMH, making it a great time to sell premium. This is because a lot of the companies that comprise SMH have earnings coming up.
Let’s head to the TradingBlock options chain to find our strikes:
As always, it’s best to start at the midpoint between the bid and ask when placing option trades. If the order doesn’t fill right away, work it down in small increments until you get filled. Read more about options liquidity here.
Assuming a midpoint fill, the total credit we collect on this trade is $4.60, as seen below. Since we sold a 5-point spread for $4.60, our margin is only $0.40 ($40) per spread here, which is what we'll have to set aside in buying power to place the trade.
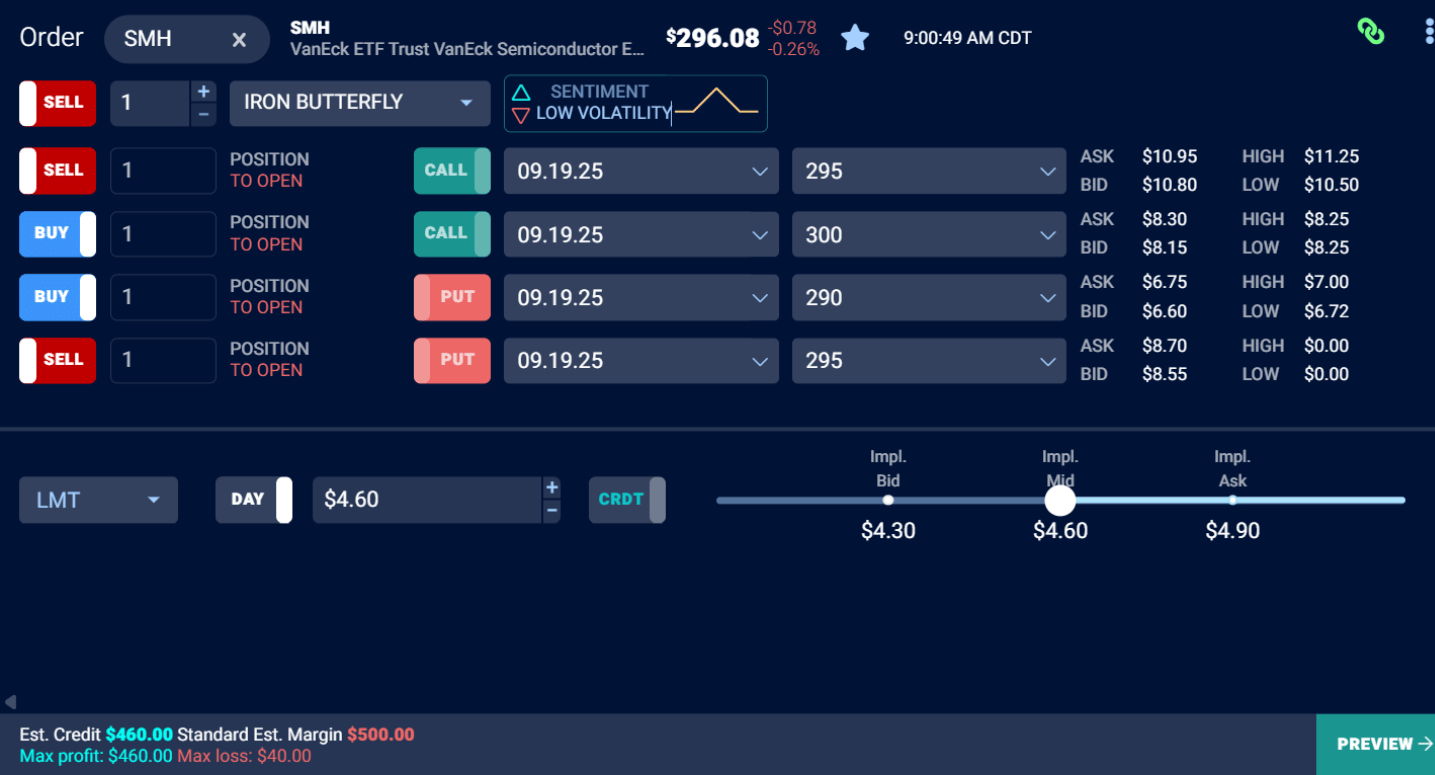
SMH Iron Butterfly Trade Details
And here are the details of the trade we just put on:
- Trade Type: Short Iron Butterfly
- Underlying: SMH (VanEck Semiconductor ETF)
- Days to Expiration: 31 DTE
- Strike Prices:
- Sell 295 Call for $10.88
- Buy 300 Call for $8.23
- Sell 295 Put for $8.63
- Buy 290 Put for $6.68
- Total Credit Received: $4.60
- Spread Width: $5.00
- Max Loss: Spread width – Credit = $5.00 – $4.60 = $0.40
- Margin Requirement: $40 per spread
- Max Profit: $460 per spread
- Break-Evens:
- Lower BE: 295 – 4.60 = $290.40
- Upper BE: 295 + 4.60 = $299.60
And now let’s explore a couple of trade outcomes!
SMH Iron Butterfly: Winning Outcome
30 days later, after some volatility, SMH closed at $294, just $1 below our strike. The market-neutral trade ended with a solid profit.
- SMH Price: $296.08 → $294.00 📉
- Expiration: 31 days → 0
- Sell 295 Call @ $10.88 → $0.00
- Buy 300 Call @ $8.23 → $0.00
- Sell 295 Put @ $8.63 → –$1.00 (intrinsic value)
- Buy 290 Put @ $6.68 → $0.00
- Initial Spread Value: $4.60 credit received
- Spread Value at Expiration: $1.00
- Profit: $3.60 ($360 total)
- Percent of Max Profit: ~78% ✅
Max profit would only have happened if SMH had closed right at $295 on expiration. That would leave every option worthless and allow us to keep the full $4.60 credit. But pinning a strike like that is rare and not something to expect consistently.
Closing at $294 still delivered $3.60 of profit, or about 78% of the maximum. This was a great trade.
Let’s now see how this trade played out in real time.
SMH Winning Trade: Under The Hood
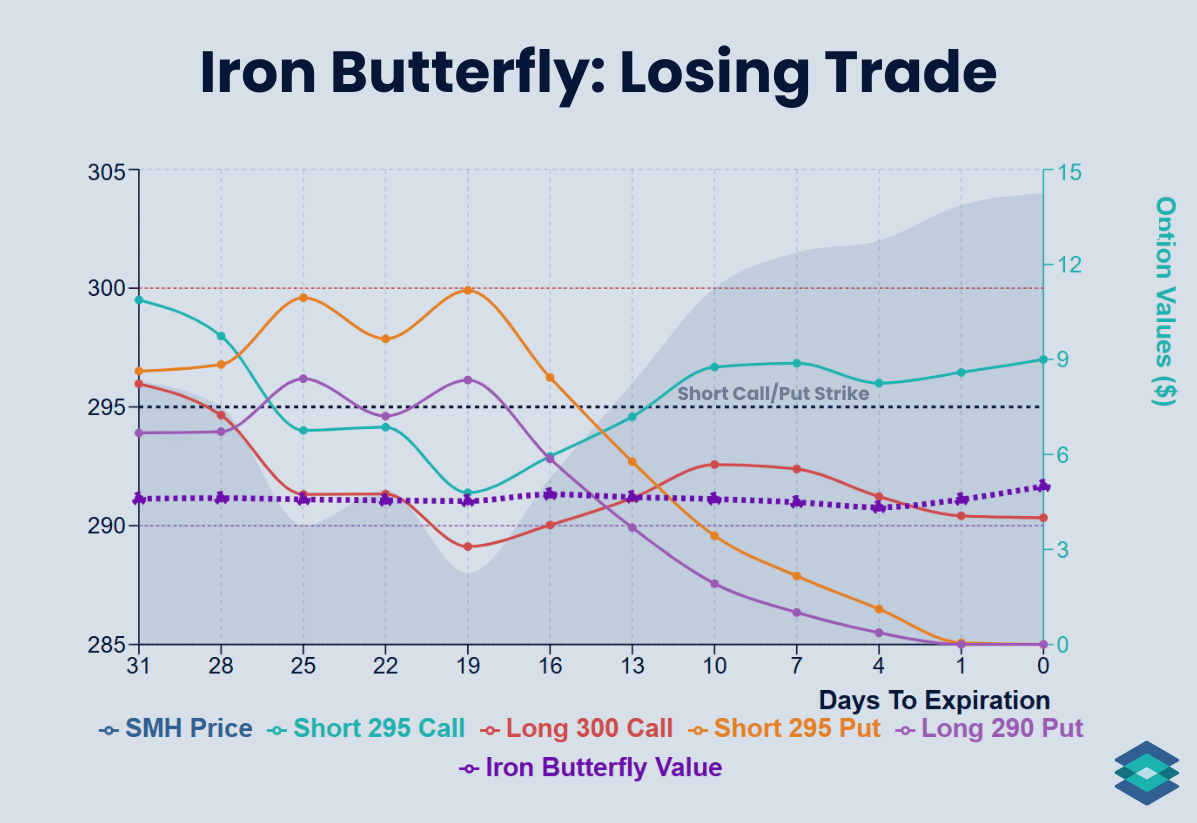
Here’s how our individual legs and the net spread value played out as time passed and the underlying stock gyrated in value:
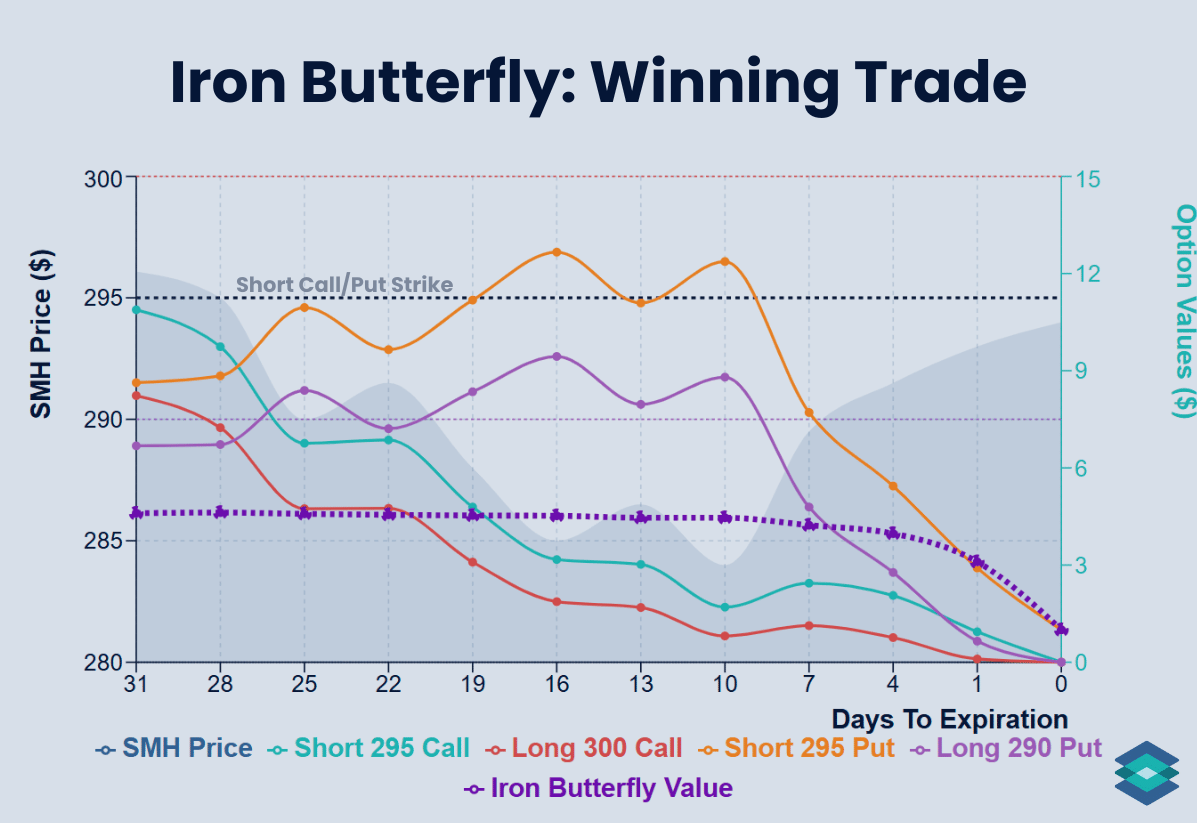
As the chart shows, most of the option decay picked up near expiration, which is especially true for an iron butterfly since both short strikes were at the money.
But the last few days also bring high gamma risk, meaning the position’s delta can swing rapidly with small stock moves.
Here, SMH closed just under 295. We didn’t hit the rare max-profit pin, but we still kept $3.60, or about 78% of the maximum. This was a great trade and a clear example of how defined risk and strong theta can line up.
SMH Iron Butterfly: Losing Outcome
31 days have passed, and SMH rallied hard on the back of good earnings, closing at $304/share on expiration. This move pushed the stock well above our short strikes, and the trade finished at max loss:
- SMH Price: $296.08 → $304.00 📈
- Expiration: 31 days → 0
- Sell 295 Call @ $10.88 → –$9.00
- Buy 300 Call @ $8.23 → +$4.00
- Sell 295 Put @ $8.63 → $0.00
- Buy 290 Put @ $6.68 → $0.00
- Initial Spread Value: $4.60 credit received
- Spread Value at Expiration: $5.00
- Loss: –$0.40 (–$40 total)
- Percent of Max Profit: 0% ❌
Since SMH closed well above our short 295 strike, the 295/300 call spread settled for its full $5.00 value. After subtracting the $4.60 we collected up front, that left us with a $0.40 loss per spread, which was the cost of our trade and the most we could lose.
And here’s how this losing trade played out in real time:
SMH Losing Trade: Under The Hood
This is a great example of gamma gone wrong. If we had closed out the call side of the spread with just a few days left, we could have salvaged a large portion of the trade and maybe even locked in a profit. There is little strategy involved in the final days: holding through expiration is more like gambling than trading.
It’s also worth noting this trade likely would not have made it to expiration in practice. SMH options are American-style, meaning they can be exercised at any point. That brings the risk of early assignment, especially on the short 295 call once SMH began rallying above the strike.
Iron Butterfly Margin Requirements
Iron butterflies are defined-risk trades, so brokers require margin equal to the max loss.
- Max Loss = Wing Width – Credit Received
For example, if you collect a $3.00 credit on a $5-wide iron butterfly, your max loss is:
- 5 – 3 = $2.00, or $200
That $200 is your margin requirement.
Choosing Strikes (And the Right Delta)
In options trading, delta is the option Greek that refers to how much an option’s value may change given a $1 move in the underlying. Delta also tells us:
- How many shares an option trades like
- The probability the option expires in the money
When setting up a neutral iron butterfly, you want to start with your short options. These will be near the money, with deltas around 0.50, meaning each has roughly a 50% chance of finishing in the money.
- A delta range of 0.45 to 0.55 works well
- One leg may be slightly higher or lower than the other as that’s normal
Once your short strikes are set, you move to the long wings, which cap the risk on both sides. These are further out. A good range for the delta on your long options is between 0.20 and 0.30.
Example Delta Setup:
- Sell 1 ATM call (–0.50 delta)
- Sell 1 ATM put (+0.50 delta)
- Buy 1 OTM call (+0.20 to +0.30 delta)
- Buy 1 OTM put (–0.20 to –0.30 delta)
The result is a net delta near zero, giving you a true neutral position. You collect option premium at the center and define risk on the edges.
Over time, however, this delta-neutral position will likely drift, especially as the stock moves and expiration gets closer. One side will pick up more delta, and the position can lean bullish or bearish depending on where the stock goes.
When that happens, it may make sense to adjust, close early, or roll the trade out.
Understanding Gamma Risk
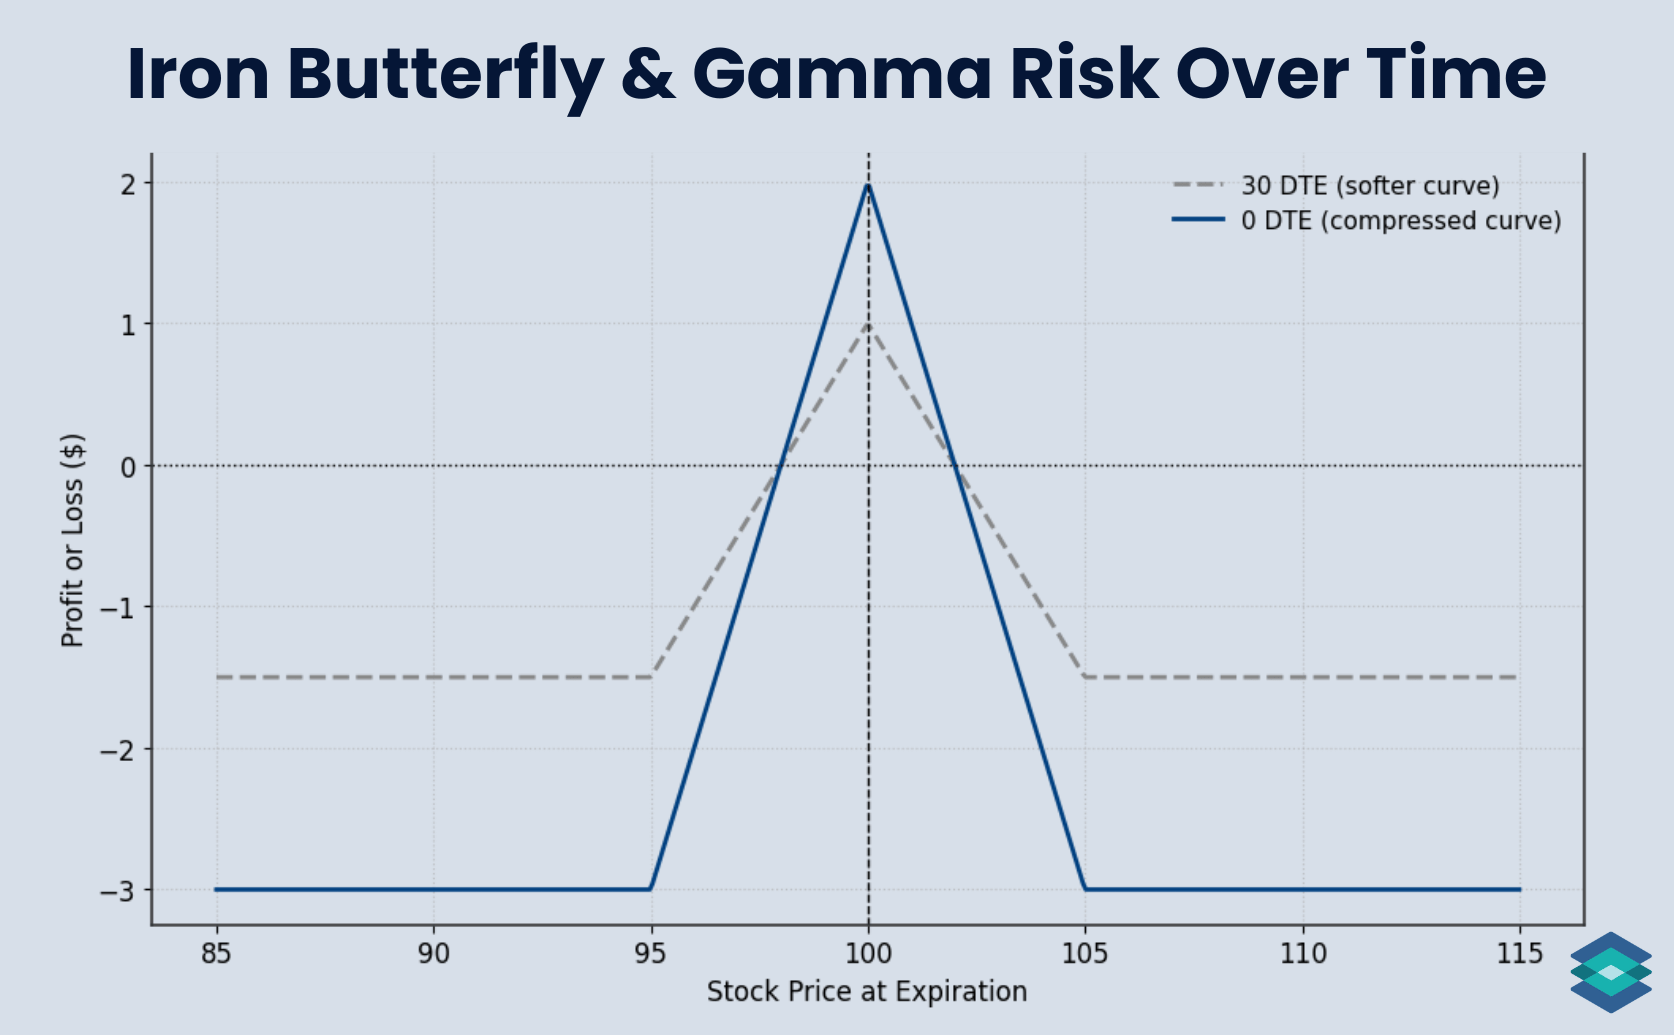
Gamma measures how fast your position’s delta changes as the stock moves. In other words, it shows how sensitive your trade is to small price moves.
Gamma is highest when the stock is near your short strike, right where your trade is most profitable. Small moves here can quickly shift your position from neutral to directional.
As expiration nears, gamma spikes sharply. As you can see below, gamma risk builds slowly then jumps in the final days when the stock hovers near the strike:
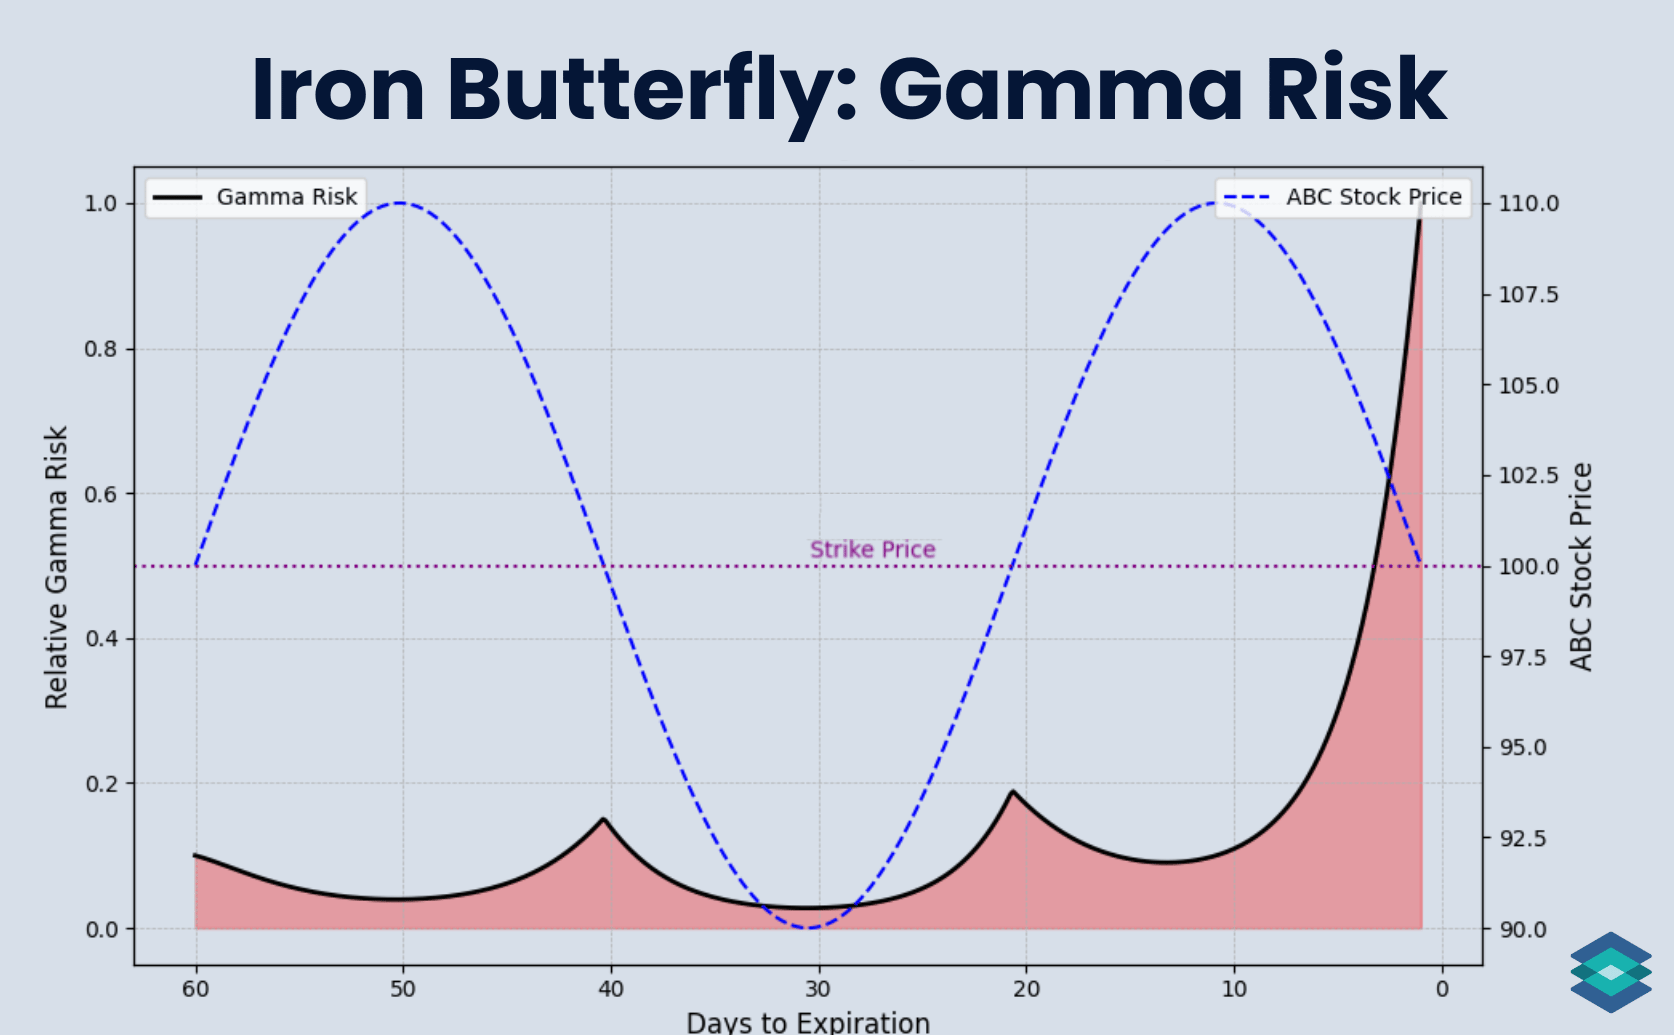
This peak gamma means managing risk late in the trade is crucial.
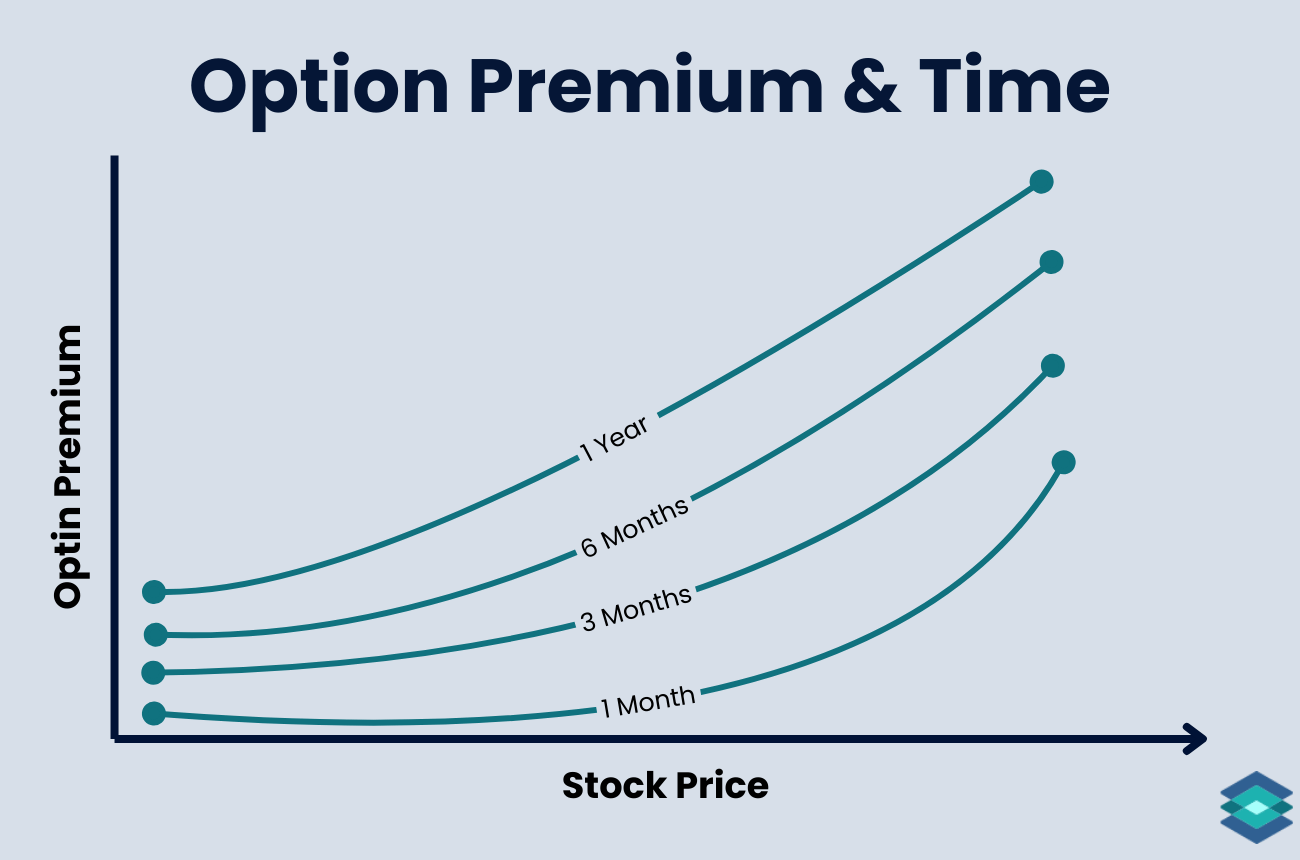
Iron Butterflies and Time Decay (Theta)
Theta measures how much an option’s price decays each day, assuming everything else stays the same. It’s the Greek tied to time decay, and when you’re selling premium, it’s what you want working in your favor.
At the money options (the ones we’re selling) have the highest theta. We can see this below for SMH options on the TradingBlock dashboard:
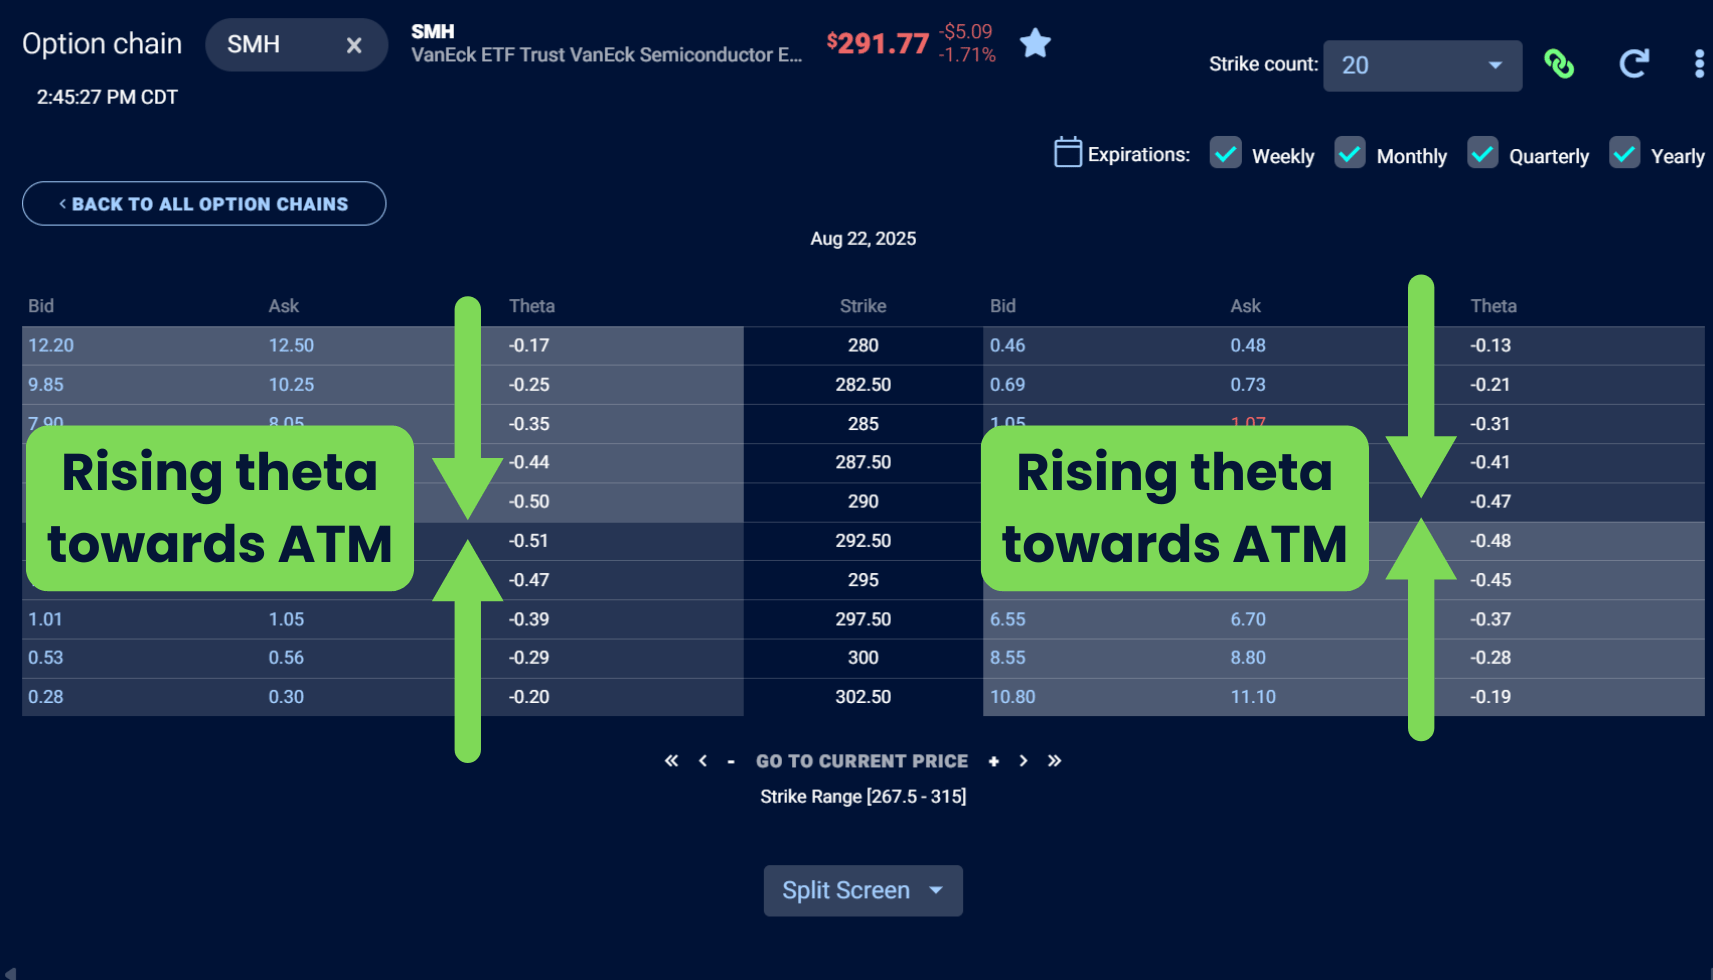
Since you’re selling both the call and the put at the money, you’re positioned to collect maximum daily decay. If the stock stays near the short strike and implied volatility holds steady, the trade benefits from the passage of time.
While the short straddle portion benefits from theta decay, the long wings have negative theta. These long options ideally lose value over time, but they’re not there to make us money, they’re there to limit risk.
Iron Butterflies: Choosing Expiration Cycles (DTE)
When picking a duration for iron butterflies, you're balancing theta decay with gamma risk. Shorter durations decay faster but also move faster. Longer durations decay more slowly and give you more breathing room.
A common entry approach is to target the 30 to 45 DTE window. That range gives you:
- Strong daily theta decay
- Contained gamma risk
- Enough time to stay agile if the trade moves against you
Going shorter, like under 14 days, increases decay but also ramps up gamma. Price movements get sharper, and trades become harder to manage. Some traders prefer it for quick setups, others avoid it unless they’re watching closely.
Iron Butterflies and The Greeks
In options trading, the Greeks are a set of risk metrics that help estimate how an option’s price will respond to changes in key market variables. Here are the five most important Greeks to know:
- Delta – shows how much the option price changes for a $1 move in the stock.
- Gamma – shows how much delta shifts when the stock moves $1.
- Theta – shows how much the option loses in value each day from time decay.
- Vega – shows how much the option price changes for a 1% change in implied volatility.
- Rho – shows how much the option price changes for a 1% change in interest rates.
And here is the relationship between iron butterflies and these Greeks:
⚠️ Iron butterflies are advanced option trades. While risk is capped by the long wings, sharp moves beyond them can still cause significant losses. This strategy is not suitable for all investors. Trade results can be affected by assignment risk, commissions, fees, and slippage—factors not shown in the examples. Always read The Characteristics and Risks of Standardized Options before trading.
.svg)
.svg)
.svg)
.svg)
.svg)
.svg)
FAQ
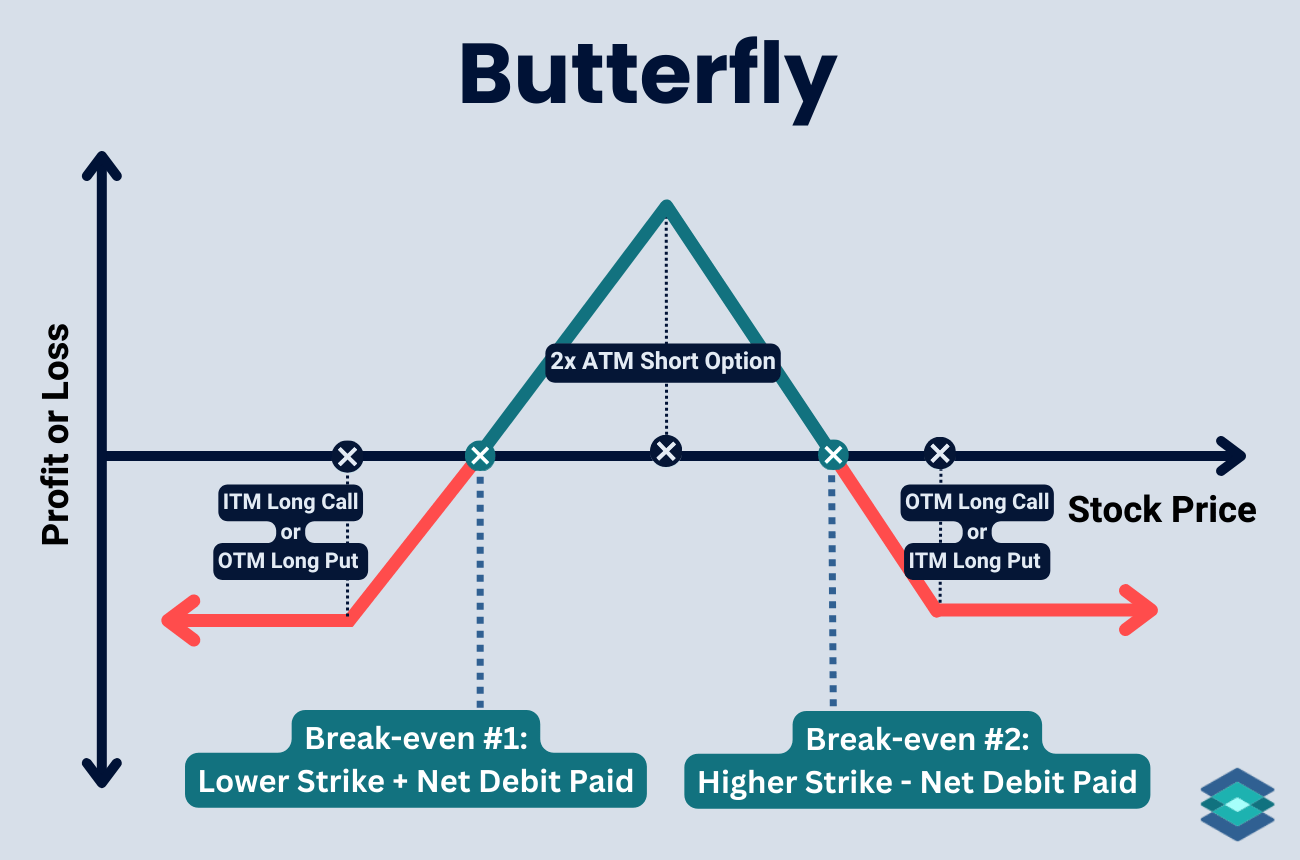
A butterfly spread uses either all calls or all puts with three strikes, while an iron butterfly combines both calls and puts by selling a straddle at one strike and buying protective wings above and below.
An iron condor involves selling a put spread and a call spread with wider strikes, creating a larger profit zone, whereas an iron butterfly sells a straddle at the same strike with tighter wings, focusing profits around that strike.
The maximum loss occurs if the stock price moves beyond the long wings, calculated as the distance between the short strike and the wing minus the net credit collected.
Maximum profit happens when the stock finishes exactly at the short strike at expiration, allowing you to keep the entire premium collected.
The main risks include the stock moving sharply away from the short strike, causing losses up to the max defined by the wings, and increased gamma risk near expiration that can cause rapid changes in position sensitivity and potential losses.
Condor: Uses only calls or only puts. You buy one option, sell two closer to the money, and buy another further out.
Short Iron Condor: Combines calls and puts. You sell one call and one put, then buy further out calls and puts to limit risk.
Key Difference: Condors use one option type, while iron condors use both.